Showing posts with label JavaScript. Show all posts

Friday, October 26, 2018

Add a document library\list webpart on another site (IsDlg=1) Sharepoint

In this post you can see how to add a document library\list webpart on another site and hide some thing in ribbon.


I suggest you display document library in another site using Page View web part. The link set for Page View web part is <your library URL>/Forms/AllItems.aspx?IsDlg=1.

Add Page View web part and add link <your library URL>/Forms/AllItems.aspx?IsDlg=1


We can hide the ribbon, and other stuff on the page.

Hide ribbon

You will need to put this code on original location of document library.

Add Content Editor web part and put code in.

<script src="//ajax.googleapis.com/ajax/libs/jquery/1.11.1/jquery.min.js"></script>

<script type="text/javascript">

_spBodyOnLoadFunctionNames.push("hideItAll");

function hideItAll(){
 if(window.location.search.toLowerCase().indexOf("isdlg=1") > 0){
 $("#s4-ribbonrow").hide(); //ribbon bar
 }
}
</script>


Hide "new document"

Add code also on original location of document library


<script src="//ajax.googleapis.com/ajax/libs/jquery/1.11.1/jquery.min.js"></script>
<script type="text/javascript">

_spBodyOnLoadFunctionNames.push("hideItAll");
function hideItAll(){
 if(window.location.search.toLowerCase().indexOf("isdlg=1") > 0){
 $("#s4-ribbonrow").hide(); //ribbon bar

 //because the bar joins us late in the game, we need to throw CSS in to hide it
 $("head").append("<style>#Hero-WPQ2 { display:none }</style>");

 }
}
</script>


Ref:
https://social.technet.microsoft.com/Forums/office/en-US/6bc6f9eb-2dbc-427b-a11d-f9cbe0988978/adding-a-document-library-webpart-on-another-site-with-columns?forum=sharepointgeneral
https://davidlozzi.com/2014/10/28/sharepoint-hiding-ribbon-and-more-with-isdlg/

Wednesday, September 26, 2018

Show names of attachments from a SharePoint list item in a column


If you want to display the name of the attachment and click on the name to open the document in list view, here is a solution.


  • Enable the "Attachments" field in list view.


  • Save the following code as a js file(showAttachments.js) and then upload the file into Site Assets document library.

(function () {
    (window.jQuery || document.write('<script src="//code.jquery.com/jquery-3.1.0.min.js"><\/script>'));
    //Create object that have the context information about the field that we want to change it output render 
    var linkFiledContext = {};
    linkFiledContext.Templates = {};
    linkFiledContext.Templates.Fields = {       
        "Attachments": { "View": AttachmentsFiledTemplate }
    };
    SPClientTemplates.TemplateManager.RegisterTemplateOverrides(linkFiledContext);
})();

// This function provides the rendering logic for list view
function AttachmentsFiledTemplate(ctx) {
    var itemId = ctx.CurrentItem.ID;
    var listName = ctx.ListTitle;      
    return getAttachments(listName,itemId);
}

function getAttachments(listName,itemId) {
 
    var url = _spPageContextInfo.webAbsoluteUrl;
    var requestUri = url + "/_api/web/lists/getbytitle('" + listName + "')/items(" + itemId + ")/AttachmentFiles";
    var str = "";
    // execute AJAX request
    $.ajax({
        url: requestUri,
        type: "GET",
        headers: { "ACCEPT": "application/json;odata=verbose" },
        async: false,
        success: function (data) {
            for (var i = 0; i < data.d.results.length; i++) {
                str += "<a href='" + data.d.results[i].ServerRelativeUrl + "'>" + data.d.results[i].FileName + "</a>";
                if (i != data.d.results.length - 1) {
                    str += "<br/>";
                }               
            }         
        },
        error: function (err) {
            //alert(err);
        }
    });
    return str;
}


  • Add the following reference in JSLINK in list view web part

~site/SiteAssets/showAttachments.js


Thursday, February 8, 2018

SharePoint 2013 Display promoted links on multiple rows - script

Every item has a default of 160px, so when you want to show rows of 3 items, just limit the space to 3*160 = 480px.
Simply add a content editor or script editor to the page and add this code:

<style>
/*display rows of 3 items*/
.ms-promlink-body {
      width: 480px;
}
</style>

If you also have buttons on top (when you have more items in the row than can be shown on the page), you can add this part to the script to remove those buttons:

<style>
/*hide the arrows when you have more items than viewable*/
.ms-promlink-header{
display:none;
}
</style>

Always Open SharePoint 2013 Tasks in Edit Mode

  • Open the task list in SharePoint Designer and create a new List Form
  • In the Create New List Form window, set the Filename as “RedirectToEditForm”, the type as Display, and check “Set as the default for the selected type”. Also pick your Workflow Task content type.
  • Open the Form in Designer so that the code is displayed, then click the “Advanced Mode” button in the ribbon bar. This will open the entire page for edits. 
  • Insert the following javascript directly after the line <asp:Content ContentPlaceHolderId="PlaceHolderMain" runat="server"> (this is around line 15) 
  • <script type="text/javascript">
        <!--
        var origUrl = window.location.toString();
        var editUrl = origUrl.replace("RedirectToEditForm","EditForm");
        window.location = editUrl;
        //-->
    </script>
  • Save the form, accepting the change from the site definition

Now whenever someone opens a task, the EditForm is automatically displayed and only one click is needed to approve or reject the task

Hide "See Also" panel in Display Forms - SharePoint 2013

On the right-hand side of the screen when viewing the display form of a task item, there is a “See Also” section that displays documents which don’t apply to the task. How to hide "See Also"?


Add Content Editor web part in Display form. Insert code:


<style>

.ms-recommendations-panel{

       display:none !important;

}

</style>

Friday, November 17, 2017

One picture icon with multiple links - SharePoint


How to click on one picture icon and open multiple links?

Add Content Editor Web Part

Edit source

<p><a href="#" onclick="window.open('http://google.com');
    window.open('http://yahoo.com');"><img src="https://projekti/test/pictures/freepik.jpg" style="margin:5px; width:68px; height=67px"></a></p>


 Save


Tuesday, October 24, 2017

Show / Hide fields based on choice field selection using JQuery in SharePoint


As example I have created a simple list with:
  • Name (Single line of text)
  • Insurance (Choice)
  • Family member1 (Single line of text)
  • Family member2 (Single line of text)
  • Family member3 (Single line of text)
If the Insurance field value is Family, fields Family member1, Family member2, Family member are "show". For other options in the Insurance, Family members fields are "hide".


Edit Default New form


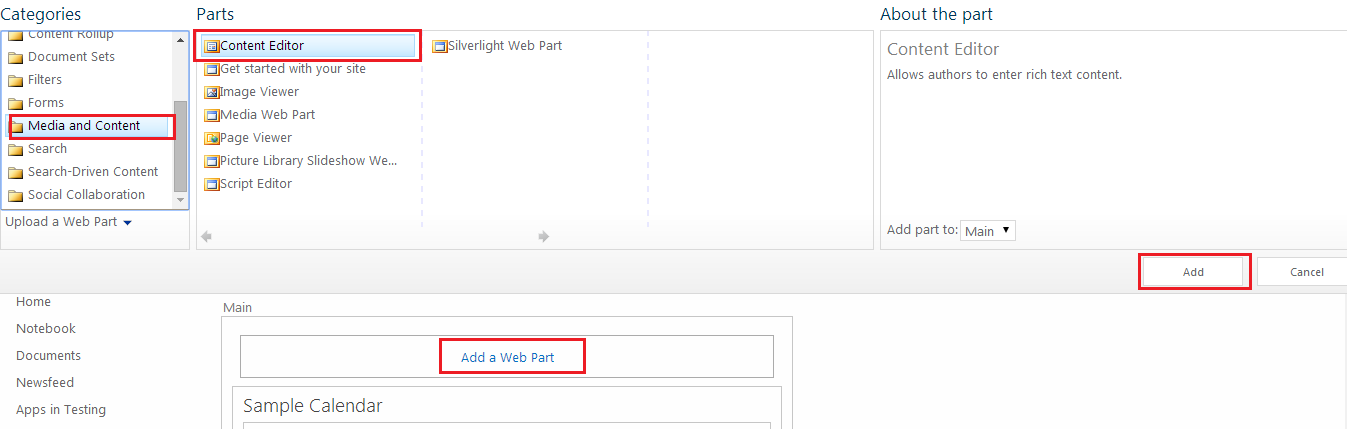
Add a Web Part, Media and Content, Contend Editor.
In Edit Source paste next script

<script src="https://projekti/mc-putno_osiguranje/Shared%20Documents/jquery-1.3.2.js" type=text/javascript></script>
 
<script type="text/javascript">
 
// Execute the following JavaScript after the page has fully loaded, when it's ".ready"
$(document).ready(function(){
 
//Define which columns to show/hide by default
  $('nobr:contains("Family member1")').closest('tr').hide();
  $('nobr:contains("Family member2")').closest('tr').hide();
  $('nobr:contains("Family member3")').closest('tr').hide();
//Show/hide columns based on Drop Down Selection
 $("select[title='Insurance']").change(function() {
  if ($("select[title='Insurance']").val() == "Family") {
  $('nobr:contains("Family member1")').closest('tr').show();
  $('nobr:contains("Family member2")').closest('tr').show();
  $('nobr:contains("Family member3")').closest('tr').show()
  } else if($("select[title='Insurance']").val() != "Family"){
  $('nobr:contains("Family member1")').closest('tr').hide();
  $('nobr:contains("Family member2")').closest('tr').hide();
  $('nobr:contains("Family member3")').closest('tr').hide();
  }
 });
});
</script>


Save Page.


Download jquery-1.3.2.js from link

Friday, June 2, 2017

Add List Filter Search - SharePoint 2013

How to add custom filter search in SharePoint list?


Add Content editor web part


Instert code:

<script type="text/javascript">
 function RedirectUrl() {
 var tb = document.getElementById("tbSearch").value;
 var cs = document.getElementById("sfield").value;
 var url = "";

 if (tb != "") {
  if (cs == "Title" || cs == "Country"){
  url = "FilterField1=" + cs + "&FilterValue1=" + tb;
  window.location.href = "AllItems.aspx?" + url;
  }
  else { 
  url = "FilterName=" + cs + "&FilterMultiValue=*" + tb + "*";
  window.location.href = "AllItems.aspx?" + url;
  }
  }
  else {
  return false;
  }
 }
 function ClearUrl() {
 window.location.href = "AllItems.aspx";
 }
</script>
Search Field: <select id="sfield">
<option selected value="Title">Title</option>
<option value="Country">Country</option>
</select>
&nbsp;
Search text: <input type="text" id="tbSearch" />
<input type="button" id="btnSearch" value="Search" onclick="return RedirectUrl();" />
<input type="button" id="btnClear" value="Clear" onclick="return ClearUrl();" />


Save page.


Insert value in search box

Wednesday, December 23, 2015

Freeze header for title in SharePoint 2013 List/Library

If you have a long list in your site, when you scroll down then the headers are not appearing. That's why every time users should scroll-up and down. How to freeze header for title in SharePoint 2013 List/Library?


Before.


1. Access the library/list.
2. Then click on Edit Page.
3. Then Add an App 'Content Editor Web Part'


4. Then click on Content Editor Web Part and add the below script by clicking on 'Edit Source' from the Ribbon.
5. After you have paste the below code click on Page Tab click on Stop Editing.
6. That's it!


After.


Script:


<script src="https://ajax.googleapis.com/ajax/libs/jquery/1.11.0/jquery.min.js" type="text/javascript"></script>

<script type="text/javascript">

jQuery(document).ready(function(){

stickyHeaders()

})

function stickyHeaders(){

if( jQuery.inArray( "spgantt.js", g_spPreFetchKeys ) > -1){

SP.SOD.executeOrDelayUntilScriptLoaded(function () {

findListsOnPage();

}, "spgantt.js");

} else {

findListsOnPage();

}

$(window).bind('hashchange', findListsOnPage);

}

function findListsOnPage() {

var lists          = $('.ms-listviewtable')

var quickEditLists = [];

var listViews      = [];

$(lists).each(function(i){

if($(this).find('div[id^="spgridcontainer"]').length > 0 ){

quickEditLists.push($(this))

} else if( $(this).hasClass("ms-listviewgrid") == false ) {

listViews.push($(this))

}

})

if(quickEditLists.length > 0) {

SP.GanttControl.WaitForGanttCreation(function (ganttChart) {

initializeStickyHeaders(quickEditLists, "qe");

});

}

if(listViews.length > 0) {

initializeStickyHeaders(listViews, "lv");

}

}

function initializeStickyHeaders (lists, type) {

var top_old        = [], top_new        = [],

bottom_old     = [], bottom_new     = [],

stickies       = [], headers        = [],

indexOffset    = 0 ;

var style = "position:fixed;" +

"top:65px;" +

"z-index:1;" +

"background-color:beige;" +

"box-shadow:3px 3px 5px #DDDDDD;" +

"display:none"

$(window).unbind('resize.' + type);

$(window).bind  ('resize.' + type, updatestickies );

$('#s4-workspace').unbind('scroll.' + type);

$('#s4-workspace').bind  ('scroll.' + type, updatestickies );

$(lists).each(function(){

headers.push($(this).find($('.ms-viewheadertr:visible')))

});

$(headers).each(function (i) {

var table = $(this).closest("table");

if(table.find("tbody > tr").length > 1) {

table.parent().find(".sticky-anchor").remove()

table.parent().find(".sticky").remove()      

var anchor = table.before('<div class="sticky-anchor"></div>')

stickies.push($(this).clone(true,true).addClass("sticky").attr('style', style).insertAfter(anchor))

var tbodies = $(this).parent("thead").siblings("tbody")

if(tbodies.length > 1) {

tbodies.bind("DOMAttrModified", function(){

setTimeout(function(){

$('#s4-workspace').trigger("scroll", true)

}, 250)

})

}

} else {

headers.splice(i-indexOffset,1)

indexOffset++;

}

})

//Do it once even without beeing triggered by an event

updatestickies();

function updatestickies (event, DOMchangeEvent) {

$(headers).each(function (i) {

if(DOMchangeEvent) {

width();

return false;

}

function width() {

stickies[i].width(headers[i].width()).find('th').each(function (j) {

$(this).width(headers[i].find('th:nth-child(' + (j+1) + ')').width())

})

}

top_old[i]    = top_new[i]

top_new[i]    = Math.round($(this).offset().top - 45)

bottom_old[i] = bottom_new[i]

bottom_new[i] = Math.round(top_new[i] - 30 + $(this).closest('table').height())

stickies[i].offset({

left: Math.round(headers[i].closest("div[id^=WebPartWPQ]").offset().left)

});

if(top_old[i] >= 0 && top_new[i] <= 0 ||

bottom_old[i] <= 0 && bottom_new[i] >= 0 ||

top_old[i] === undefined && bottom_old[i] === undefined && top_new[i] < 0 && bottom_new[i] > 0 ) {

width();

stickies[i].fadeIn();

} else if (top_old[i] <= 0 && top_new[i] >= 0 || bottom_old[i] >= 0 && bottom_new[i] <= 0 ) {

stickies[i].fadeOut();

}

})

}

}

</script>


Reference: This code is refered from the below article.
http://tussharonoffice365.blogspot.com/2014/05/how-to-freeze-header-for-title-in.html

Wednesday, March 11, 2015

Displaying Promoted Links on Multiple Lines SharePoint

When you use the SharePoint "Promoted Links" web part on one of your pages, there is the possibility that the web part uses a lot of horizontal space because you need to display a large number of tiles.


Firstly, you’ll need to upload the JavaScript. You can download the JavaScript from here.
It is important to upload the JavaScript file to the Site Collection Master Page gallery, in the Display Templates folder.

  1. Go to the Settings > Site Settings.
  2. Click “Master Pages”
  3. Click “Display Templates”
  4. Upload the file, ensuring it is called “MultilinePromotedLinks.js”


Next, edit the web part, and scroll to the “JSLink” property, under “Miscellaneous”. Paste in JSLink property “~sitecollection/_layouts/15/sp.init.js|~sitecollection/_catalogs/masterpage/display templates/MultilinePromotedLinks.js”.


 Apply the changes to your web part, and save the changes.


Tuesday, January 20, 2015

Hide All Day Event and Recurrence fields from calendar in SharePoint 2013

How to simple hide fields "All Day Event" and "Recurrence" from SharePoint calendar with javascript? Here is a solution.


Open your Calendar.
Navigate to Calendar tab->expand Form Web Parts->and click on Default New form.


In Default New form edit page, click on Add a Web Part and select the Content Editor Web part.


From Content Editor Web part, Click on Click here to add new Content.


Now select Edit Source from ribbon and add java script to HTML

<script type="text/javascript">

_spBodyOnLoadFunctionNames.push("hideall()");
function hideall()
{
HideField("Recurrence");
HideField("All Day Event");
}

function HideField(title){
var header_h3=document.getElementsByTagName("h3") ;

for(var i = 0; i <header_h3.length; i++)
{
   var el = header_h3[i];
   var foundField ;
  if(el.className=="ms-standardheader")
   {
       for(var j=0; j<el.childNodes.length; j++)
       { 
           if(el.childNodes[j].innerHTML == title || el.childNodes[j].nodeValue == title)
           { 
               var elRow = el.parentNode.parentNode ;
               elRow.style.display = "none"; //and hide the row
               foundField = true ;
               break;
           }
       }        
   }
   if(foundField)
       break ;
}
}
</script>
Save.
That's it!