Tuesday, February 10, 2015

"Save Site As Template" Missing SharePoint 2013


SharePoint 2013 does not support "Save Site as Template" option on Publishing sites. If a site with "SharePoint Server Publishing" is activated this option will not available in  Site settings, So you can't save site as template. What should we do? 


Enable Save site as template SharePoint 2013 with SharePoint Designer

Open SharePoint Designer 2013.

Open Web application which you are not able to see ”Save Site As Template” options.


In the home page of SharePoint Designer 2013, there is a option: “Site Options” in the top Ribbon


Click on “Site Options”, you will get prompt, In the “Parameters”  Tab, you can find “SaveSiteAsTempalteEnabled”


Check what is the value for “SaveSiteAsTempalteEnabled”, if it is a false.


Click on Modify..


Change to True.


Save


Close


Now, When you access the save site as template URL you should be able to get the save site as template page.


Or Enable Save site as template SharePoint 2013 with PowerShell


Add-PSSnapin Microsoft.SharePoint.PowerShell

$SiteURL ="http://intranet.crescent.com/sites/operations"

$web = Get-SPWeb -Identity $SiteURL

#Enable Save Site as template option
$web.SaveSiteAsTemplateEnabled = $true
$web.Update()


Tuesday, January 27, 2015

Customized color code calendar in SharePoint 2013


To create a color coded calendar using the out of the box SharePoint Calendars Overlay feature, a Site Owner will need to:
1.  Configure the default Calendar column, Category.
2.  Create a view for each category entered.
3.  Create a New Calendar for each view created per category.

1. Configure the default Calendar column, Category.


To modify the Category column, navigate to the Calendar to be modified.  Access its List Settings via the Ribbon, on the Calendar tab, select List Settings.


In the Columns section, double-click the Category column to open and modify.


In the Additional Column Settings section, input few categories.
Note:  More than ten categories can be entered, but only ten views can have colors assigned to them.


2. Create a view for each category entered


 Create the first new view.  Start from the existing Calendar view.


Name of the view - Category1
Set the view’s filter to display only items that are assigned to the first category type, Category1.  Select Ok to save and continue.
Repeat Step for Category choices Category2 and Category3.


Modify default Calendar view.


Category is equal to "blank"


3.Create a New Calendar for each view created per category

Navigate back to the Calendar list.  Ensure the Calendar view is displaying.  Access the Calendar settings via the Ribbon, from the Calendar tab, select Calendars Overlay.


In the Category Overlay settings, select New Calendar.
For each category type being assigned a color code, create a New Calendar and assign the appropriate category list view .


Name the New Calendar (In this example I am naming the Category1).  Next, select a color code, then input the web URL of the site the calendar is located on (i.e. http://sitename.com, or http://sitename.com/subsite, etc.) and hit Resolve.
Note:  After hitting Resolve all Calendar lists in the site will now be available to select in the List drop down, and all list views per the selected calendarwill populate in the List View drop down.


Repeat Step for the remaining calendar overlay views (New Calendar).  When complete, the list of Additional Calendars will display as below.


The views being used to display the color coding are listed in the Quick Launch under Calendars in View.


How to add different colors to Calendar Overlay?

Tuesday, January 20, 2015

Hide All Day Event and Recurrence fields from calendar in SharePoint 2013

How to simple hide fields "All Day Event" and "Recurrence" from SharePoint calendar with javascript? Here is a solution.


Open your Calendar.
Navigate to Calendar tab->expand Form Web Parts->and click on Default New form.


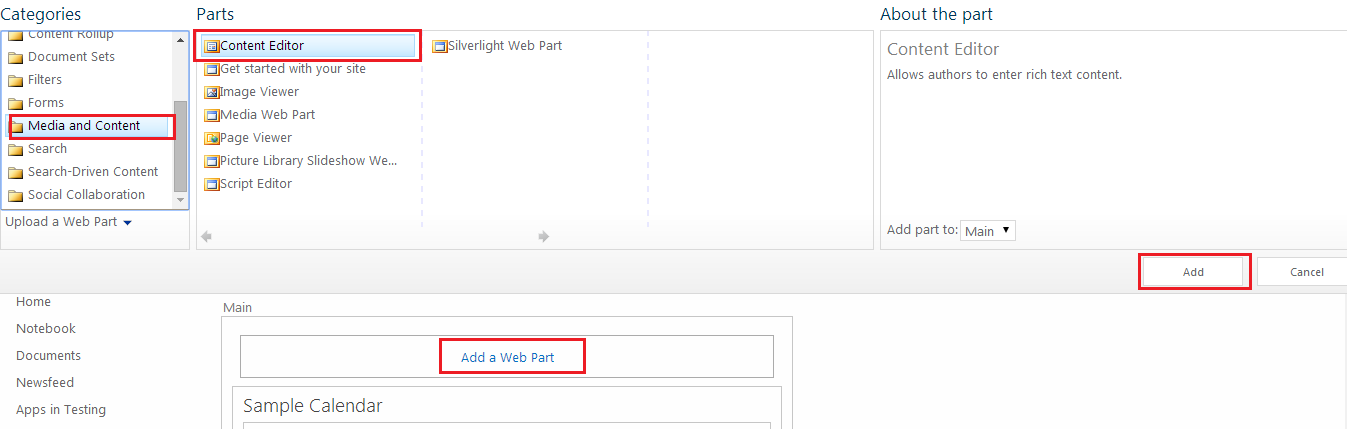
In Default New form edit page, click on Add a Web Part and select the Content Editor Web part.


From Content Editor Web part, Click on Click here to add new Content.


Now select Edit Source from ribbon and add java script to HTML

<script type="text/javascript">

_spBodyOnLoadFunctionNames.push("hideall()");
function hideall()
{
HideField("Recurrence");
HideField("All Day Event");
}

function HideField(title){
var header_h3=document.getElementsByTagName("h3") ;

for(var i = 0; i <header_h3.length; i++)
{
   var el = header_h3[i];
   var foundField ;
  if(el.className=="ms-standardheader")
   {
       for(var j=0; j<el.childNodes.length; j++)
       { 
           if(el.childNodes[j].innerHTML == title || el.childNodes[j].nodeValue == title)
           { 
               var elRow = el.parentNode.parentNode ;
               elRow.style.display = "none"; //and hide the row
               foundField = true ;
               break;
           }
       }        
   }
   if(foundField)
       break ;
}
}
</script>
Save.
That's it!

Friday, January 16, 2015

"Connect to Outlook" disabled, greyed out - SharePoint 2013

SharePoint users unable to connect to any SharePoint 2013 list or calendar to Outlook 2013.  The "Connect to Outlook" Ribbon button is always greyed out. Here is a solution!


Resolution:

-Open the site collection on which you are not able to ‘connect to outlook’

-site actions

-site settings

-manage site features

-There is a feature called "Minimal Download Strategy"


-Deactivate this feature

Once this feature will be deactivated then try to ‘connect to outlook’.

Tuesday, January 13, 2015

Group by Year and Month using calculated column in SharePoint 2013

How often have you wanted to group the data that you have created in a SharePoint List, by Month or Year, but not sure how to get that information without asking the user to capture it for you? The user experience should be simple and not become more and more cumbersome as you want more robust reporting. You can solve this problem easily by using use a Column with a calculated field.
The only criteria needed, to enable you to group by Month or Year, using a calculated column, is that there must be a base column in Date Format to calculate from.

In the list or document library created two columns, one for Year and one for Month.

For Year the formula will be:
=TEXT([DataField];"yyyy")


For Month column, the formula will look like below:
=TEXT(MONTH([DataField]);"00")&" "&TEXT([DataField];"mmmm")

If you need the three letters of the month name, replace "mmmm" with "mmm"


Now create the view, in the View the Group By condition should be look like below.


That's it!


Monday, December 22, 2014

Use the Excel Web Access Web Part in SharePoint 2013

Suppose that you have published an Excel workbook to a SharePoint library, and now you want to display all or part of that workbook in its own SharePoint Web Part. You can do this by using a special Web Part known as the Excel Web Access Web Part.

Create Excel Services Application. LINK
Manage Excel Services trusted file locations. LINK


Create excel document with chart or table.


Save to SharePoint library.


In Browser View Options check chart.


Edit page.


Insert, Web Part. From the Categories menu, select Business Data.
From the Parts menu, select Excel Web Access and click add button.


Click here to open the tool pane.


Click the button under Workbook and choose excel file.
In the Named Item textbook, enter the name of chart or table.
Ok, Save Page.


That's it!


 Web part is automatically synchronizes with excel file.

Wednesday, December 17, 2014

Missing Blank Site Template in SharePoint 2013

When settings up site collectons, many use the Blank Site Template.
But in SharePoint 2013 no Blank Site Template.


Solution:

Run the command Get-SPWebTemplate to get the full list of the available templates.
Blank Site template ID is STS#1.


Go to folder C:\Program Files\Common Files\Microsoft Shared\Web Server Extensions\15\TEMPLATE\1033\XML ,and open the WEBTEMP.XML file. There, you'll find a link like this.


Just change the Hiden="TRUE" to Hiden="FALSE"

Next time you want to create a new site, you'll get the Blank Site Template.


This is for English Language pack, for other Language choose diferent folder of  "1033"  C:\Program Files\Common Files\Microsoft Shared\Web Server Extensions\15\TEMPLATE\1033\XML
E.g. For Serbian (Latin) Language pack is "2074".

Wednesday, December 10, 2014

Enable workspace field in an existing SharePoint 2013 calendar

Meeting workspaces, site templates designed specially for meetings, are a discontinued feature in SharePoint 2013.
In SharePoint 2013 the meeting workspace templates are still available, but hidden.
But what if you want to use meeting workspaces on an existing calendar created from the SharePoint 2013 standard calendar template or a calendar that has been migrated from SharePoint 2010. It’s quite easy using the SharePoint Management Shell.


Replace URL and the name of your calendar.

$web = Get-SPWeb http://portal
$list = $web.Lists["Calendar"]
$myAss = [Reflection.Assembly]::LoadWithPartialName("Microsoft.SharePoint");
$type = $myAss.GetType("Microsoft.SharePoint.SPField");
[System.Reflection.BindingFlags]$flags = [System.Reflection.BindingFlags]::Instance -bor [System.Reflection.BindingFlags]::NonPublic
$SetFieldBoolValue = $type.GetMethod("SetFieldBoolValue",$flags)
$field = $list.Fields.GetFieldByInternalName("WorkspaceLink")
$arr = @()
$arr+="Sealed"
$arr+=$false
$SetFieldBoolValue.Invoke($field, $arr);
$arr = @()
$arr+="Hidden"
$arr+=$false
$SetFieldBoolValue.Invoke($field, $arr);
$method = $type.GetMethod("UpdateCore", $flags);
$method.Invoke($field, $true);
$field.ShowInEditForm = $true
$field.ShowInViewForms = $true
$field.Update()

Wednesday, November 26, 2014

Create Approval WorkFlow - SharePoint 2013


Create Library "Documents"
Create list "Approver Info" with two columns.
Name: "Editor"
Type: "Person or Group"
Require that this column contains information: "Yes"
Allow multiple selections: "No"
Allow selection of: People Only
Choose from: "All Users"

Similarly create "Approver" column and enter data.


Open SharePoint Designer 2013, open site.
On the ribbon, open List Workflow, choose Documents.


Enter name of Workflow.


Action, Set Workflow status, enter "Pending".


Action,  Set Workflow variable, create new variable.
Name "Approver", Type "String"


On Value click fx (define workflow lookup)
Enter data from two next pictures.


Click "Yes"


Action,  Start a task process.
These users, Participans field.
Add "Workflow Lookup for a Users and Groups"
Enter data from next picture.


Enter Task Title.


Condition, If any value equals value.


In first "value" click fx, enter data from next picture.
In second "value" choose Approved.


Action, Send an Email.
Click "To", Enter data from next picture.
(This mail will be send to Editor)


Define body of Email.


 Mark "If Varable Outcome....". and choose on the ribbon "Else Branch"


Action, Set Workflow status, set to Reject.
Action, Send an Email. Enter data from next picture.


Transition to stage, right click, go to stage.
End of Workflow.


In option of Workflow, check next fields.


Save and publish. Close SharePoint Designer.


On Sharepoint Site, in Workflow Tasks list, as Approvel, modify view.


Create document in Library "Documents" as Editor.
In Workflow Tasks when sign in as Approvel will be displayed new task to be approved.


Click on task name and edit task. That's it!