Tuesday, June 30, 2015

Cannot connect to WMI provider - SQL Server Configuration Manager


Error: “Cannot connect to WMI provider. You do not have permission or the server is unreachable. Note that you can only manage SQL Server 2005 and later servers with SQL Server Configuration Manager.”


Resolution:

Open command prompt, navigate following path:
C:\Program Files <x86>\Microsoft SQL Server\110\Shared

The value of number depends on the version of SQL Server

Microsoft SQL Server 2012
110
Microsoft SQL Server 2008 R2
100
Microsoft SQL Server 2008
100
Microsoft SQL Server 2005
90

 
Type next command, and then press ENTER:

mofcomp sqlmgmproviderxpsp2up.mof


After you run the Mofcomp tool, make sure to restart the WMI service for the changes to take effect.

Event ID 5586, Cannot generate SSPI context


Event Viewer:

Unknown SQL Exception 0 occurred. Additional error information from SQL Server is included below.The target principal name is incorrect.  Cannot generate SSPI context.


Solution:

Logon to the SQL server using Domain Admin rights.

Start command prompt as Administrator:
setspn -L MyDomain\MyUserName
Registered ServicePrincipleNames for CN=MyUserName Service Account, OU=Service Accounts, DC=MyDomain,DC=com: mssqlsvc/MyServer1.MyDomain.com:MyPort mssqlsvc/MyServer2.MyDomain.com:MyPort mssqlsvc/MyServer3.MyDomain.com:MyPort

Note: MyUserName will be SharePoint Timer Service account, this is SharePoint Farm account

If you are getting the error (Cannot generate SSPI context), you will not find the SQL server name in the list displayed by the command.

To Register your SQL server type the following command.
setspn -A MSSQLSvc/MyServer.MyDomain.com:1433 MyDomain\MyAccount
Note:- MyServer will be the SQL server name to which you are not able to connect.

Again run the
setspn -L MyDomain\MyUserName command, you should find your SQL servers FQDN registered.


Tuesday, June 23, 2015

Deploy desktop shortcut and Icon using a Group Policy

You can easily to add desktop shortcuts using Group Policy with just a few clicks.

Open Group Policy Management

Click on "Create a GPO in this domain, and Link it here..."


Type Name of GPO.


Right click on GPO, Edit.


Then will be open Group Policy Management Editor.
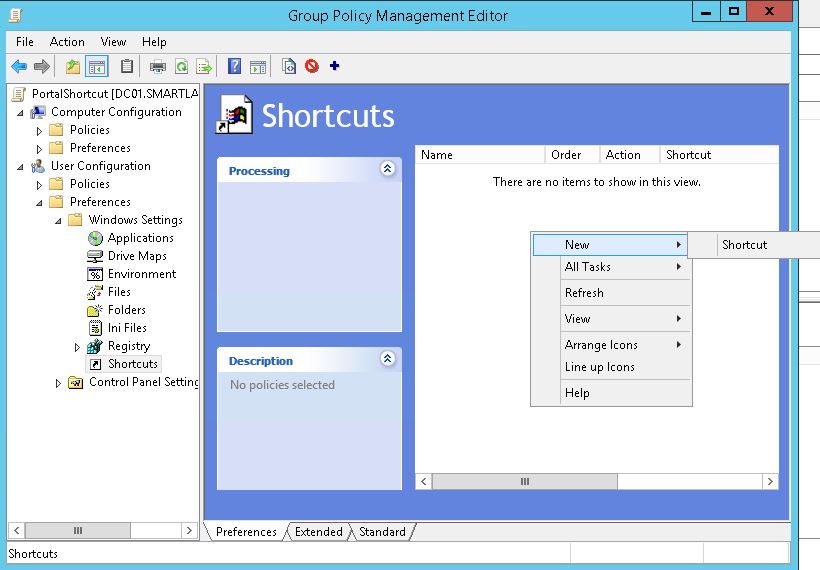
Navigate to User Configuration, Windows Settings, Shortcuts.


Right click, New, Shortcut.


Configure Properties.


"Gpupdate /force" in PowerShell on user machine, or restart.


Enable email notification in task list in SharePoint

How to send a email notifications in SharePoint task list to persons who have been assigned list items?

Run SharePoint Management Shell as Administrator

$site=Get-SPWeb "http://SiteURL"
$list=$site.Lists.TryGetList("List Name")
if($list -ne $null)
{
   $list.EnableAssignToEmail =$true
   $list.Update()
}


Tasks in SharePoint MySite - "Last updated" every minute


How to reduce the refresh time for Tasks in SharePoint My Site?


Start SharePoint Management Shell as Administrator

$wmservice = Get-SPServiceApplication -Name "Work Management Service Application"

$refreshTime = New-Timespan -Minutes 1

Set-SPWorkManagementServiceApplication -Identity $wmservice -MinimumTimeBetweenProviderRefreshes $refreshTime


Tuesday, April 7, 2015

Recover SharePoint Farm Managed Account Passwords

You lost password for SharePoint accounts? Recover them from PowerShell

This script will Display the SharePoint Farm Managed Accounts password including the Farm Account, without requiring the current user to be a part of the SharePoint Farm Admin Group.

Run PowerShell as Administrator on a SharePoint Server.


Download script


#------------------------------------------------------------------------------------------
# Name:            Recover-SPManagedAccounts
# Description:    This script will retrieve the Farm Account credentials and show the 
#                passwords for all of the SharePoint Managed Accounts
# Usage:        Run the script on a SP Server with an account that has Local Admin Rights
# By:            Ivan Josipovic, Softlanding.ca
#------------------------------------------------------------------------------------------

#Checks if the Current PowerShell Session is running as the Administrator
if(([Security.Principal.WindowsPrincipal] [Security.Principal.WindowsIdentity]::GetCurrent()).IsInRole([Security.Principal.WindowsBuiltInRole] "Administrator") -eq $false){
    Throw "This Script must be ran as Administrator"
}

#This section retrives the Farm Account UserName/Password from the Security Token Service Application Pool
$Farm_user = C:\Windows\System32\cmd.exe /q /c $env:windir\system32\inetsrv\appcmd.exe list apppool "SecurityTokenServiceApplicationPool" /text:ProcessModel.UserName;
$Farm_pass = C:\Windows\System32\cmd.exe /q /c $env:windir\system32\inetsrv\appcmd.exe list apppool "SecurityTokenServiceApplicationPool" /text:ProcessModel.Password;
$Credential = New-Object System.Management.Automation.PsCredential($Farm_user, (ConvertTo-SecureString $Farm_pass -AsPlainText -Force));

# This line contains the script which returns the account passwords, script is from http://sharepointlonghorn.com/Lists/Posts/Post.aspx?ID=11
$GetManagedAccountPasswords = "
Add-PSSnapin Microsoft.SharePoint.PowerShell -EA 0;
function Bindings(){
    return [System.Reflection.BindingFlags]::CreateInstance -bor
    [System.Reflection.BindingFlags]::GetField -bor
    [System.Reflection.BindingFlags]::Instance -bor
    [System.Reflection.BindingFlags]::NonPublic;
}
function GetFieldValue([object]`$o, [string]`$fieldName){
    `$bindings = Bindings;
    return `$o.GetType().GetField(`$fieldName, `$bindings).GetValue(`$o);
}
function ConvertTo-UnsecureString([System.Security.SecureString]`$string){ 
    `$intptr = [System.IntPtr]::Zero;
    `$unmanagedString = [System.Runtime.InteropServices.Marshal]::SecureStringToGlobalAllocUnicode(`$string);
    `$unsecureString = [System.Runtime.InteropServices.Marshal]::PtrToStringUni(`$unmanagedString);
    [System.Runtime.InteropServices.Marshal]::ZeroFreeGlobalAllocUnicode(`$unmanagedString);
    return `$unsecureString;
}
Get-SPManagedAccount | select UserName, @{Name='Password'; Expression={ConvertTo-UnsecureString (GetFieldValue `$_ 'm_Password').SecureStringValue}}";

#Writes the Script to the Public Folder (C:\Users\Public), this is required as we cant run the script inline as its too long.
Set-Content -Path "$($env:public.TrimEnd("\"))\GetManagedAccountPasswords" -Value $GetManagedAccountPasswords;

#The Script which will be ran in the new PowerShell Window running as the Farm Account, it also removes the script above which we wrote to the file system
$Script = "
`$Script = Get-Content `"$($env:public.TrimEnd("\"))\GetManagedAccountPasswords`";
PowerShell.exe -Command `$Script;
Remove-Item `"$($env:public.TrimEnd("\"))\GetManagedAccountPasswords`";
Add-PSSnapin Microsoft.SharePoint.PowerShell -EA 0;"

#Runs PowerShell as the Farm Account and loads the Script above
Start-Process -FilePath powershell.exe -Credential $Credential -ArgumentList "-noexit -command $Script" -WorkingDirectory C:\


Monday, April 6, 2015

Create new Host Header Site Collection in a new content database SharePoint 2013

Host-Named Site Collection (HNSC) is actually a means to have a separate DNS for each site collection rather than having all the site collections follow the URL of the web application (path-based site collections). Now you can to have and separate database with PowerShell.

 Download script


Add-PSSnapin Microsoft.SharePoint.PowerShell –ErrorAction SilentlyContinue
 $webapp = Read-Host "Enter WebApplication URL"
 $dbserver = Read-Host "Enter SQL Server"
 $siteurl = Read-Host "Enter Host Header Site Collection URL"
 $site = Read-Host "Enter Host Header Site Collection Name"
 $language = Read-Host "Enter Language (2074)"
 $dbname = Read-Host "Enter ContentDB name of WebApplication"
 $dbname1 = Read-Host "Enter ContentDB name of HHSC"
 $owner1 = Read-Host "Enter Primary Site Collection Administrator (DOMAIN\UserName)"
 $owner2 = Read-Host "Enter Secondary Site Collection Administrator (DOMAIN\UserName)"
 New-SPContentDatabase -Name $dbname1 -DatabaseServer $dbserver -WebApplication $webapp | out-null
 New-SPSite $siteurl -OwnerAlias $owner1 -SecondaryOwnerAlias $owner2 -ContentDatabase $dbname1 -HostheaderWebApplication $webapp -Name $site -Language $language
 Get-SPContentDatabase -Site $siteUrl | Set-SPContentDatabase -maxSiteCount 1 -WarningSiteCount 0
Write-Host “Site Collection at” $site “has been created in the” $dbname1 “content database” -ForegroundColor Yellow


Create HostA in DNS.
Open IIS Manager, Sites, Edit Bindings on WebApplication, add Site Binding (picture).
Change on all SharePoint servers.


When you open site in browser choose site template and set up groups for site.

Wednesday, April 1, 2015

Import Google embed map in SharePoint web part


How to Embed Google Maps to a SharePoint?

Google Maps can be embedded onto a Microsoft SharePoint page very easily using a Google Maps and web part.


Open https://maps.google.com


Find location. 


Copy link.


Open SharePoint site, Edit page, Insert, Embed Code.


Paste link.

Insert.

 
Save.


Wednesday, March 25, 2015

Search for SharePoint Foundation 2013 using PowerShell

How to create and configure Search Service Application for SharePoint Foundation using PowerShell? Here is a solution.


Change in script:

Name of Server.

Name of Search Service Application.

To find name of Service Application Pool use next command Get-SPServiceApplicationPool.
You get one of next Service Appliction Pool:
"SharePoint Web Services System"   "SharePoint Web Services Default"


Change Application Pool in script for $svcPool and $adminPool.


Script:

#Start the search service instance on the server
Get-SPEnterpriseSearchServiceInstance -Local | Start-SPEnterpriseSearchServiceInstance
$serverName="SAVA"
Start-SPEnterpriseSearchQueryAndSiteSettingsServiceInstance -Identity $serverName

#Give a unique name to your search service application
$serviceAppName = "Search Service Application"

#Get the application pools to use (make sure you change the value for your environment)
$svcPool = Get-SPServiceApplicationPool "SharePoint Web Services Default"
$adminPool = Get-SPServiceApplicationPool "SharePoint Web Services Default"

#Get the service from the service instance so we can call a method on it
$searchServiceInstance = Get-SPEnterpriseSearchServiceInstance –Local
$searchService = $searchServiceInstance.Service

#Define your unique DB names without the guids
$adminDB = "Search_Service_Application_DB"
$propertyStoreDB = "Search_Service_Application_PropertyStoreDB"
$crawlStoreDB = "Search_Service_Application_CrawlStoreDB"
$analysticsStoreDB = "Search_Service_Application_AnalyticsStoreDB"
$linkStoreDB = "Search_Service_Application_LinkStoreDB"

#Since this method takes in the value of object type Microsoft.SharePoint.Administration.SPDatabaseParameters we will
create these from our clean DB names
$adminDBParameters = [Microsoft.SharePoint.Administration.SPDatabaseParameters]::CreateParameters($adminDB,"None")
$propertyDBParameters = [Microsoft.SharePoint.Administration.SPDatabaseParameters]::CreateParameters
($propertyStoreDB,"None")
$crawlStoreDBParameters = [Microsoft.SharePoint.Administration.SPDatabaseParameters]::CreateParameters
($crawlStoreDB,"None")
$analyticsStoreDBParameters = [Microsoft.SharePoint.Administration.SPDatabaseParameters]::CreateParameters
($analysticsStoreDB,"None")
$linkStoreDBParameters = [Microsoft.SharePoint.Administration.SPDatabaseParameters]::CreateParameters($linkStoreDB,"None")

#Create the search service application by calling the function
$searchServiceApp = $searchService.CreateApplication($serviceAppName, $adminDBParameters, $propertyDBParameters,
$crawlStoreDBParameters, $analyticsStoreDBParameters, $linkStoreDBParameters,
[Microsoft.SharePoint.Administration.SPIisWebServiceApplicationPool]$svcPool,
[Microsoft.SharePoint.Administration.SPIisWebServiceApplicationPool]$adminPool)

#Create the search service application proxy as usual (luckily PowerShell for this works and is bot blocked)
$searchProxy = New-SPEnterpriseSearchServiceApplicationProxy -Name "$serviceAppName Proxy" -SearchApplication
$searchServiceApp
#Provision the search service application
$searchServiceApp.Provision()


At this point the search service application will be provisioned without any topology components. Active topology using next script.


#Now we will call the method to initiate the default topology component creation using reflection
$bindings = @("InvokeMethod", "NonPublic", "Instance")
$types = @([Microsoft.Office.Server.Search.Administration.SearchServiceInstance])
$values = @([Microsoft.Office.Server.Search.Administration.SearchServiceInstance]$searchServiceInstance)
$methodInfo = $searchServiceApp.GetType().GetMethod("InitDefaultTopology", $bindings, $null, $types, $null)
$searchTopology = $methodInfo.Invoke($searchServiceApp, $values)


Now you need some patience while all the components spring to life behind the scenes. This can take some time depending how robust your environment is.


Wednesday, March 11, 2015

Displaying Promoted Links on Multiple Lines SharePoint

When you use the SharePoint "Promoted Links" web part on one of your pages, there is the possibility that the web part uses a lot of horizontal space because you need to display a large number of tiles.


Firstly, you’ll need to upload the JavaScript. You can download the JavaScript from here.
It is important to upload the JavaScript file to the Site Collection Master Page gallery, in the Display Templates folder.

  1. Go to the Settings > Site Settings.
  2. Click “Master Pages”
  3. Click “Display Templates”
  4. Upload the file, ensuring it is called “MultilinePromotedLinks.js”


Next, edit the web part, and scroll to the “JSLink” property, under “Miscellaneous”. Paste in JSLink property “~sitecollection/_layouts/15/sp.init.js|~sitecollection/_catalogs/masterpage/display templates/MultilinePromotedLinks.js”.


 Apply the changes to your web part, and save the changes.


Tuesday, February 10, 2015

"Save Site As Template" Missing SharePoint 2013


SharePoint 2013 does not support "Save Site as Template" option on Publishing sites. If a site with "SharePoint Server Publishing" is activated this option will not available in  Site settings, So you can't save site as template. What should we do? 


Enable Save site as template SharePoint 2013 with SharePoint Designer

Open SharePoint Designer 2013.

Open Web application which you are not able to see ”Save Site As Template” options.


In the home page of SharePoint Designer 2013, there is a option: “Site Options” in the top Ribbon


Click on “Site Options”, you will get prompt, In the “Parameters”  Tab, you can find “SaveSiteAsTempalteEnabled”


Check what is the value for “SaveSiteAsTempalteEnabled”, if it is a false.


Click on Modify..


Change to True.


Save


Close


Now, When you access the save site as template URL you should be able to get the save site as template page.


Or Enable Save site as template SharePoint 2013 with PowerShell


Add-PSSnapin Microsoft.SharePoint.PowerShell

$SiteURL ="http://intranet.crescent.com/sites/operations"

$web = Get-SPWeb -Identity $SiteURL

#Enable Save Site as template option
$web.SaveSiteAsTemplateEnabled = $true
$web.Update()


Tuesday, January 27, 2015

Customized color code calendar in SharePoint 2013


To create a color coded calendar using the out of the box SharePoint Calendars Overlay feature, a Site Owner will need to:
1.  Configure the default Calendar column, Category.
2.  Create a view for each category entered.
3.  Create a New Calendar for each view created per category.

1. Configure the default Calendar column, Category.


To modify the Category column, navigate to the Calendar to be modified.  Access its List Settings via the Ribbon, on the Calendar tab, select List Settings.


In the Columns section, double-click the Category column to open and modify.


In the Additional Column Settings section, input few categories.
Note:  More than ten categories can be entered, but only ten views can have colors assigned to them.


2. Create a view for each category entered


 Create the first new view.  Start from the existing Calendar view.


Name of the view - Category1
Set the view’s filter to display only items that are assigned to the first category type, Category1.  Select Ok to save and continue.
Repeat Step for Category choices Category2 and Category3.


Modify default Calendar view.


Category is equal to "blank"


3.Create a New Calendar for each view created per category

Navigate back to the Calendar list.  Ensure the Calendar view is displaying.  Access the Calendar settings via the Ribbon, from the Calendar tab, select Calendars Overlay.


In the Category Overlay settings, select New Calendar.
For each category type being assigned a color code, create a New Calendar and assign the appropriate category list view .


Name the New Calendar (In this example I am naming the Category1).  Next, select a color code, then input the web URL of the site the calendar is located on (i.e. http://sitename.com, or http://sitename.com/subsite, etc.) and hit Resolve.
Note:  After hitting Resolve all Calendar lists in the site will now be available to select in the List drop down, and all list views per the selected calendarwill populate in the List View drop down.


Repeat Step for the remaining calendar overlay views (New Calendar).  When complete, the list of Additional Calendars will display as below.


The views being used to display the color coding are listed in the Quick Launch under Calendars in View.


How to add different colors to Calendar Overlay?

Tuesday, January 20, 2015

Hide All Day Event and Recurrence fields from calendar in SharePoint 2013

How to simple hide fields "All Day Event" and "Recurrence" from SharePoint calendar with javascript? Here is a solution.


Open your Calendar.
Navigate to Calendar tab->expand Form Web Parts->and click on Default New form.


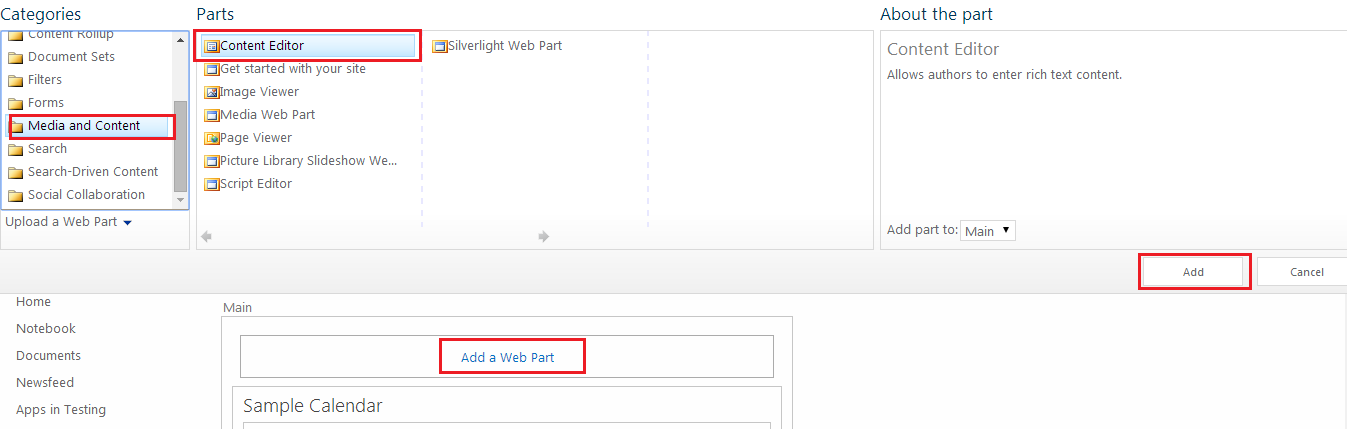
In Default New form edit page, click on Add a Web Part and select the Content Editor Web part.


From Content Editor Web part, Click on Click here to add new Content.


Now select Edit Source from ribbon and add java script to HTML

<script type="text/javascript">

_spBodyOnLoadFunctionNames.push("hideall()");
function hideall()
{
HideField("Recurrence");
HideField("All Day Event");
}

function HideField(title){
var header_h3=document.getElementsByTagName("h3") ;

for(var i = 0; i <header_h3.length; i++)
{
   var el = header_h3[i];
   var foundField ;
  if(el.className=="ms-standardheader")
   {
       for(var j=0; j<el.childNodes.length; j++)
       { 
           if(el.childNodes[j].innerHTML == title || el.childNodes[j].nodeValue == title)
           { 
               var elRow = el.parentNode.parentNode ;
               elRow.style.display = "none"; //and hide the row
               foundField = true ;
               break;
           }
       }        
   }
   if(foundField)
       break ;
}
}
</script>
Save.
That's it!

Friday, January 16, 2015

"Connect to Outlook" disabled, greyed out - SharePoint 2013

SharePoint users unable to connect to any SharePoint 2013 list or calendar to Outlook 2013.  The "Connect to Outlook" Ribbon button is always greyed out. Here is a solution!


Resolution:

-Open the site collection on which you are not able to ‘connect to outlook’

-site actions

-site settings

-manage site features

-There is a feature called "Minimal Download Strategy"


-Deactivate this feature

Once this feature will be deactivated then try to ‘connect to outlook’.

Tuesday, January 13, 2015

Group by Year and Month using calculated column in SharePoint 2013

How often have you wanted to group the data that you have created in a SharePoint List, by Month or Year, but not sure how to get that information without asking the user to capture it for you? The user experience should be simple and not become more and more cumbersome as you want more robust reporting. You can solve this problem easily by using use a Column with a calculated field.
The only criteria needed, to enable you to group by Month or Year, using a calculated column, is that there must be a base column in Date Format to calculate from.

In the list or document library created two columns, one for Year and one for Month.

For Year the formula will be:
=TEXT([DataField];"yyyy")


For Month column, the formula will look like below:
=TEXT(MONTH([DataField]);"00")&" "&TEXT([DataField];"mmmm")

If you need the three letters of the month name, replace "mmmm" with "mmm"


Now create the view, in the View the Group By condition should be look like below.


That's it!