Wednesday, November 26, 2014

Create Approval WorkFlow - SharePoint 2013


Create Library "Documents"
Create list "Approver Info" with two columns.
Name: "Editor"
Type: "Person or Group"
Require that this column contains information: "Yes"
Allow multiple selections: "No"
Allow selection of: People Only
Choose from: "All Users"

Similarly create "Approver" column and enter data.


Open SharePoint Designer 2013, open site.
On the ribbon, open List Workflow, choose Documents.


Enter name of Workflow.


Action, Set Workflow status, enter "Pending".


Action,  Set Workflow variable, create new variable.
Name "Approver", Type "String"


On Value click fx (define workflow lookup)
Enter data from two next pictures.


Click "Yes"


Action,  Start a task process.
These users, Participans field.
Add "Workflow Lookup for a Users and Groups"
Enter data from next picture.


Enter Task Title.


Condition, If any value equals value.


In first "value" click fx, enter data from next picture.
In second "value" choose Approved.


Action, Send an Email.
Click "To", Enter data from next picture.
(This mail will be send to Editor)


Define body of Email.


 Mark "If Varable Outcome....". and choose on the ribbon "Else Branch"


Action, Set Workflow status, set to Reject.
Action, Send an Email. Enter data from next picture.


Transition to stage, right click, go to stage.
End of Workflow.


In option of Workflow, check next fields.


Save and publish. Close SharePoint Designer.


On Sharepoint Site, in Workflow Tasks list, as Approvel, modify view.


Create document in Library "Documents" as Editor.
In Workflow Tasks when sign in as Approvel will be displayed new task to be approved.


Click on task name and edit task. That's it!


Tuesday, November 25, 2014

Create Document Template with Metadata through Quick Parts - SharePoint 2013


Open Site Settings, Site content types.


Create new. Choose Document Content type, Document.


Create new site columns.


On local computer create Office document (word,excel...),
which will be the template.


In Content type, Advanced settings.


Upload created document,


In Library, Settings, Advanced settings.


Check "Yes".


In Library Settings, Content Types, Add from existing site content types.


Choose previously created Content type.


In Library Settings, click on Content type.


Advanced settings, Edit Template.


Insert, Quick Parts, Document Property.
Add previously created columns.


In Library, New Document open Content type.


Fill with data and save.


"Modify this View"


That's it!


Friday, November 7, 2014

Allow users to add to a list, and edit or delete ONLY their own posts SharePoint 2013


Go to "List Settings"


Open "Advanced settings"


Check "Create items and edit items that were created by the user"


 This permission does not apply to site collection administrator and owners.

Monday, October 27, 2014

Change branding text (text in top left corner) to logo SharePoint 2013

Change the word 'SharePoint' in the upper-left corner of the screen to better reflect individual branding with PowerShell


Run PowerShell command as Administrator.

$webApp = Get-SPWebApplication https://portal

$webApp.SuiteBarBrandingElementHtml = '<div class="ms-core-brandingText"><a href="https://portal"><img src="https://portal/PublishingImages/logo.jpg"/></a></div>'

$webApp.Update()


If you want to return it on default settings, here is what you need to do:

$webApp = Get-SPWebApplication https://portal

$webApp.SuiteBarBrandingElementHtml = '<div class="ms-core-brandingText">SharePoint</div>'

$webApp.Update()

Change branding text (text in top left corner) SharePoint 2013

Change the word 'SharePoint' in the upper-left corner of the screen to better reflect individual branding with PowerShell


Run PowerShell command as Administrator.

$webApp = Get-SPWebApplication https://portal

$webApp.SuiteBarBrandingElementHtml = "Portal"

$webApp.Update()

Thursday, October 23, 2014

Install and configure WorkFlow for SharePoint 2013


Prerequisites

On Active Directory create two user accounts. E.g. sp2013wf and sp2013wfsvc.
Create Workflow Admins security group. E.g.
Group name: WF Admins
Group scope: Global
Group type: Security

Add to group SharePoint Admin account, workflow and workflowservice accounts.

Log in to Server in which it will be installed WorkFlow, add workflow accounts to Administrators group.

Log in to SQL Server, connect to Microsoft SQL Server Management Studio, add workflow accounts and configure SQL Server sysadmin role.


Install and configure Workflow Manager
 
 
Log in on Workflow Server.
Install WorkFlow Manager from link
Instal all Cumulative Updates for Workflow Manager and Cumulative Updates for Service Bus from Microsoft Download Center.
Create certificate issued to Workflow Server, issued by Domen Controler.


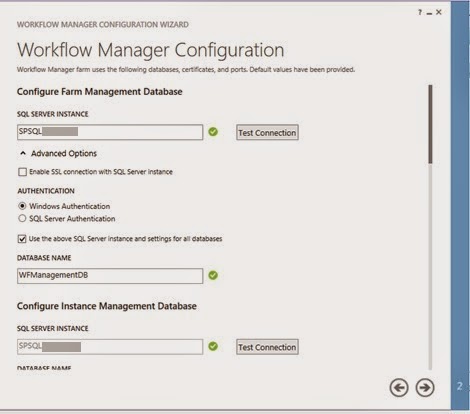
Run Workflow Manager Configuration.


Configure Workflow Manager with Custom Settings.


Choose previously created certificate on all three places.


For http communication check Allow Workflow management over http on this computer


Configure Service Bus.


Choose previously created certificate on all places.


Next, and Finish.


Install Workflow Manager Client


You must consider the following two key factors before configuring Workflow Manager to work with SharePoint Server 2013.

·         Is Workflow Manager installed on a server that is part of the SharePoint farm?

·         Will communication between Workflow Manager and SharePoint Server 2013 use HTTP or HTTPS?

These factors translate into four scenarios. Each scenario configures a SharePoint Server 2013 farm to communicate and function with the Workflow Manager farm. Follow the scenario that matches your circumstance.

1. Workflow Manager is installed on a server that is part of the SharePoint 2013 farm. Communication takes place by using HTTP.

2. Workflow Manager is installed on a server that is part of the SharePoint 2013 farm. Communication takes place by using HTTPS.

3. Workflow Manager is installed on a server that is NOT part of the SharePoint 2013 farm. Communication takes place by using HTTP.

4. Workflow Manager is installed on a server that is NOT part of the SharePoint 2013 farm. Communication takes place by using HTTPS.

Install the Workflow Manager Client on each server in the SharePoint farm.

On SharePoint Server open Internet Explorer type:
http://NameWFServer.Domain:12291/ or https://NameWFServer.Domain:12290/


If it is successfully configured Workflow Manager displays the following result


Register Workflow Service


On APP Server log in as SharePoint Administrator, open the SharePoint Management Shell as an administrator and run this command.

For http communication:
Register-SPWorkflowService –SPSite "http://NameSiteColection" –WorkflowHostUri "http://NameWFServer.Domain:12291/" –AllowOAuthHttp

For https communication:
Register-SPWorkflowService -SPSite "https://NameSiteColection" -WorkflowHostUri "https://NameWFServer.Domain:12290"


If necessary, install App Management Proxy link


Open SharePoint Designer and create Workflow.
 

Wednesday, October 8, 2014

App Management Shared Service Proxy is not installed - SharePoint WorkFlow 2013


Users report the following error message when trying to publish their 2013 workflows:

Errors were found when compiling the workflow.  The workflow files were saved but cannot be run.


Solution


  1. Log in to SharePoint 2013 farm server using the Administation user setup account.
  2. Start Central Administration.
  3. Navigate to: Application Management > Service Applications > Manage service applications.
  4. On the Service Applications ribbon, click the New button, and then select App Management Service.
  5. Enter configuration information as appropriate.
  6. Click OK. Though the service application and service application proxy are started, the App Management service itself must still be started.
  7. Navigate to: Application Management > Service Applications > Manage services on server.  Start the service.

Change favicon for SharePoint 2013

If you want to change the favicon of your site to use your own logo instead of SharePoint icon, please proceed as follows:

Default SharePoint favicon.


Create favicon  (16x16), save to disk (e.g. faviconSP).
http://tools.dynamicdrive.com/favicon/
Copy to [C:\Program Files\Common Files\Microsoft Shared\Web Server Extensions\15\TEMPLATE\IMAGES\].


In SharePoint Designer open your site Master Pages, then select the master page.
Now click "check out" and "Edit File in Advanced Mode".

Find:
<SharePoint:SPShortcutIcon runat="server"
IconUrl=”/_layouts/15/images/favicon.ico?rev=23/”


Replace "favicon.ico" with favicon name previously created.


Save and Check In.
Reset IIS, clear browser cache and check.